本文由Windows Privilege Escalation Fundamentals的译文和我们自身实践补充而成。
译者 manning、Fmelon
Windows提权基本原理
没有人提在Windows下提权,是一件让人羞愧的事!我想,没有人这么做的理由有以下几点:
- 在渗透测试项目中,客户需要的验证就是一个低权限shell。
- 在演示环境,你经常就会得到管理员帐户。
- meterpreter使你变得懒惰(getsystem = lazy-fu)。
- build reviews to often end up being –> authenticated nessus scan, microsoft security baseline analyser…
尽管通常的感觉是,配置的得当的windows是安全的。但是事实是这样吗?因此,让我们深入了解Windows操作系统的黑暗角落,看看我们是否能得到SYSTEM权限。
应该注意的是,我将使用不同版本的Windows来强调任何可能存在的命令行差异。请牢记这一点,因为不同的操作系统和版本差异会在命令行中显现。我试图构造本教程,以便它适用于Windows提权的最普遍的方式。
最后,我想对我的朋友Kostas大声说,他也真的很喜欢后渗透(post-exploitation),你真的不想让他登录到你的机器hehe。
【必要文档补充】
- Encyclopaedia Of Windows Privilege Escalation (Brett Moore)
- Windows Attacks: AT is the new black (Chris Gates & Rob Fuller)
- Elevating privileges by exploiting weak folder permissions (Parvez Anwar)
译者注:现在已经很多人讲这件事啦。原文作者提了下meterpreter,我们可以把meterpreter比做sql注入利用的sqlmap,在得到meterpreter的shell后,可以输入命令getsystem,自动完成提权。
在t0-t3阶段,最初的信息收集方法
最开始是一个低权限的shell,这个shell可能是通过远程代码执行,钓鱼,反弹得到的。基本上最开始我们对机器并不了解,比如这个机器做什么的,有什么连接,我们有什么权限,甚至操作系统是什么。
在最开始的阶段,我们得快速收集一些基本信息来评估我们的处境。
第一步,让我们找到我们连接的操作系统。
C:\Windows\system32> systeminfo | findstr /B /C:"OS Name" /C:"OS Version"
OS Name:                   Microsoft Windows 7 Professional
OS Version:                6.1.7601 Service Pack 1 Build 7601
接下来然我们看看这个机器的hostname和我们连接上是哪个用户。
C:\Windows\system32> hostname
b33f

C:\Windows\system32> echo %username%
user1
现在我们有了一些基本信息,然后我们列出了其他用户帐户,并在更详细的情况下查看我们自己的用户信息。我们已经看到user1不是localgroup Administrators。
C:\Windows\system32> net users

User accounts for \\B33F

-------------------------------------------------------------------------------
Administrator            b33f                     Guest
user1
The command completed successfully.

C:\Windows\system32> net user user1

User name                    user1
Full Name
Comment
User's comment
Country code                 000 (System Default)
Account active               Yes
Account expires              Never

Password last set            1/11/2014 7:47:14 PM
Password expires             Never
Password changeable          1/11/2014 7:47:14 PM
Password required            Yes
User may change password     Yes

Workstations allowed         All
Logon script
User profile
Home directory
Last logon                   1/11/2014 8:05:09 PM

Logon hours allowed          All

Local Group Memberships      *Users
Global Group memberships     *None
The command completed successfully.
这就是我们目前需要了解的关于用户和权限的全部内容。接下来我们要讨论的是网络信息,连接的机器是什么,以及它对这些连接施加了什么规则。
首先让我们看一下可用的网络接口和路由表。
C:\Windows\system32> ipconfig /all

Windows IP Configuration

   Host Name . . . . . . . . . . . . : b33f
   Primary Dns Suffix  . . . . . . . :
   Node Type . . . . . . . . . . . . : Hybrid
   IP Routing Enabled. . . . . . . . : No
   WINS Proxy Enabled. . . . . . . . : No

Ethernet adapter Bluetooth Network Connection:

   Media State . . . . . . . . . . . : Media disconnected
   Connection-specific DNS Suffix  . :
   Description . . . . . . . . . . . : Bluetooth Device (Personal Area Network)
   Physical Address. . . . . . . . . : 0C-84-DC-62-60-29
   DHCP Enabled. . . . . . . . . . . : Yes
   Autoconfiguration Enabled . . . . : Yes

Ethernet adapter Local Area Connection:

   Connection-specific DNS Suffix  . :
   Description . . . . . . . . . . . : Intel(R) PRO/1000 MT Network Connection
   Physical Address. . . . . . . . . : 00-0C-29-56-79-35
   DHCP Enabled. . . . . . . . . . . : Yes
   Autoconfiguration Enabled . . . . : Yes
   Link-local IPv6 Address . . . . . : fe80::5cd4:9caf:61c0:ba6e%11(Preferred)
   IPv4 Address. . . . . . . . . . . : 192.168.0.104(Preferred)
   Subnet Mask . . . . . . . . . . . : 255.255.255.0
   Lease Obtained. . . . . . . . . . : Saturday, January 11, 2014 3:53:55 PM
   Lease Expires . . . . . . . . . . : Sunday, January 12, 2014 3:53:55 PM
   Default Gateway . . . . . . . . . : 192.168.0.1
   DHCP Server . . . . . . . . . . . : 192.168.0.1
   DHCPv6 IAID . . . . . . . . . . . : 234884137
   DHCPv6 Client DUID. . . . . . . . : 00-01-00-01-18-14-24-1D-00-0C-29-56-79-35
   DNS Servers . . . . . . . . . . . : 192.168.0.1
   NetBIOS over Tcpip. . . . . . . . : Enabled

C:\Windows\system32> route print

===========================================================================
Interface List
 18...0c 84 dc 62 60 29 ......Bluetooth Device (Personal Area Network)
 13...00 ff 0c 0d 4f ed ......TAP-Windows Adapter V9
 11...00 0c 29 56 79 35 ......Intel(R) PRO/1000 MT Network Connection
  1...........................Software Loopback Interface 1
 16...00 00 00 00 00 00 00 e0 Microsoft ISATAP Adapter
 15...00 00 00 00 00 00 00 e0 Microsoft ISATAP Adapter #2
 19...00 00 00 00 00 00 00 e0 Microsoft ISATAP Adapter #3
 14...00 00 00 00 00 00 00 e0 Teredo Tunneling Pseudo-Interface
===========================================================================

IPv4 Route Table
===========================================================================
Active Routes:
Network Destination        Netmask          Gateway       Interface  Metric
          0.0.0.0          0.0.0.0      192.168.0.1    192.168.0.104     10
        127.0.0.0        255.0.0.0         On-link         127.0.0.1    306
        127.0.0.1  255.255.255.255         On-link         127.0.0.1    306
  127.255.255.255  255.255.255.255         On-link         127.0.0.1    306
      192.168.0.0    255.255.255.0         On-link     192.168.0.104    266
    192.168.0.104  255.255.255.255         On-link     192.168.0.104    266
    192.168.0.255  255.255.255.255         On-link     192.168.0.104    266
        224.0.0.0        240.0.0.0         On-link         127.0.0.1    306
        224.0.0.0        240.0.0.0         On-link     192.168.0.104    266
  255.255.255.255  255.255.255.255         On-link         127.0.0.1    306
  255.255.255.255  255.255.255.255         On-link     192.168.0.104    266
===========================================================================
Persistent Routes:
  None

IPv6 Route Table
===========================================================================
Active Routes:
 If Metric Network Destination      Gateway
 14     58 ::/0                     On-link
  1    306 ::1/128                  On-link
 14     58 2001::/32                On-link
 14    306 2001:0:5ef5:79fb:8d2:b4e:3f57:ff97/128
                                    On-link
 11    266 fe80::/64                On-link
 14    306 fe80::/64                On-link
 14    306 fe80::8d2:b4e:3f57:ff97/128
                                    On-link
 11    266 fe80::5cd4:9caf:61c0:ba6e/128
                                    On-link
  1    306 ff00::/8                 On-link
 14    306 ff00::/8                 On-link
 11    266 ff00::/8                 On-link
===========================================================================
Persistent Routes:
  None

# arp -A显示了所有可用接口的arp(地址解析协议)缓存表。

C:\Windows\system32> arp -A

Interface: 192.168.0.104 --- 0xb
  Internet Address      Physical Address      Type
  192.168.0.1           90-94-e4-c5-b0-46     dynamic
  192.168.0.101         ac-22-0b-af-bb-43     dynamic
  192.168.0.255         ff-ff-ff-ff-ff-ff     static
  224.0.0.22            01-00-5e-00-00-16     static
  224.0.0.251           01-00-5e-00-00-fb     static
  224.0.0.252           01-00-5e-00-00-fc     static
  239.255.255.250       01-00-5e-7f-ff-fa     static
  255.255.255.255       ff-ff-ff-ff-ff-ff     static
这就使我们了解了活动网络连接和防火墙规则。
C:\Windows\system32> netstat -ano

Active Connections

  Proto  Local Address          Foreign Address        State           PID
  TCP    0.0.0.0:135            0.0.0.0:0              LISTENING       684
  TCP    0.0.0.0:445            0.0.0.0:0              LISTENING       4
  TCP    0.0.0.0:5357           0.0.0.0:0              LISTENING       4
  TCP    127.0.0.1:5354         0.0.0.0:0              LISTENING       1400
  TCP    192.168.0.104:139      0.0.0.0:0              LISTENING       4
  TCP    [::]:135               [::]:0                 LISTENING       684
  TCP    [::]:445               [::]:0                 LISTENING       4
  TCP    [::]:5357              [::]:0                 LISTENING       4
  UDP    0.0.0.0:5355           *:*                                    1100
  UDP    0.0.0.0:52282          *:*                                    976
  UDP    0.0.0.0:55202          *:*                                    2956
  UDP    0.0.0.0:59797          *:*                                    1400
  UDP    127.0.0.1:1900         *:*                                    2956
  UDP    127.0.0.1:65435        *:*                                    2956
  UDP    192.168.0.104:137      *:*                                    4
  UDP    192.168.0.104:138      *:*                                    4
  UDP    192.168.0.104:1900     *:*                                    2956
  UDP    192.168.0.104:5353     *:*                                    1400
  UDP    192.168.0.104:65434    *:*                                    2956
  UDP    [::]:5355              *:*                                    1100
  UDP    [::]:52281             *:*                                    976
  UDP    [::]:52283             *:*                                    976
  UDP    [::]:55203             *:*                                    2956
  UDP    [::]:59798             *:*                                    1400
  UDP    [::1]:1900             *:*                                    2956
  UDP    [::1]:5353             *:*                                    1400
  UDP    [::1]:65433            *:*                                    2956
  UDP    [fe80::5cd4:9caf:61c0:ba6e%11]:1900  *:*                      2956
  UDP    [fe80::5cd4:9caf:61c0:ba6e%11]:65432  *:*                     2956

# 以下两个netsh命令是在不同操作系统的命令示例。netsh firewall命令只能从XP SP2和以上版本运行。

C:\Windows\system32> netsh firewall show state

Firewall status:
-------------------------------------------------------------------
Profile                           = Standard
Operational mode                  = Enable
Exception mode                    = Enable
Multicast/broadcast response mode = Enable
Notification mode                 = Enable
Group policy version              = Windows Firewall
Remote admin mode                 = Disable

Ports currently open on all network interfaces:
Port   Protocol  Version  Program
-------------------------------------------------------------------
No ports are currently open on all network interfaces.

C:\Windows\system32> netsh firewall show config

Domain profile configuration:
-------------------------------------------------------------------
Operational mode                  = Enable
Exception mode                    = Enable
Multicast/broadcast response mode = Enable
Notification mode                 = Enable

Allowed programs configuration for Domain profile:
Mode     Traffic direction    Name / Program
-------------------------------------------------------------------

Port configuration for Domain profile:
Port   Protocol  Mode    Traffic direction     Name
-------------------------------------------------------------------

ICMP configuration for Domain profile:
Mode     Type  Description
-------------------------------------------------------------------
Enable   2     Allow outbound packet too big

Standard profile configuration (current):
-------------------------------------------------------------------
Operational mode                  = Enable
Exception mode                    = Enable
Multicast/broadcast response mode = Enable
Notification mode                 = Enable

Service configuration for Standard profile:
Mode     Customized  Name
-------------------------------------------------------------------
Enable   No          Network Discovery

Allowed programs configuration for Standard profile:
Mode     Traffic direction    Name / Program
-------------------------------------------------------------------
Enable   Inbound              COMRaider / E:\comraider\comraider.exe
Enable   Inbound              nc.exe / C:\users\b33f\desktop\nc.exe

Port configuration for Standard profile:
Port   Protocol  Mode    Traffic direction     Name
-------------------------------------------------------------------

ICMP configuration for Standard profile:
Mode     Type  Description
-------------------------------------------------------------------
Enable   2     Allow outbound packet too big

Log configuration:
-------------------------------------------------------------------
File location   = C:\Windows\system32\LogFiles\Firewall\pfirewall.log
Max file size   = 4096 KB
Dropped packets = Disable
Connections     = Disable
最后,我们将简要地看一下在这个设备上运行的有什么,比如计划任务、运行进程、启动服务和安装的驱动程序。
# 这将显示所有调度任务的详细输出,下面您可以看到单个任务的示例输出。

C:\Windows\system32> schtasks /query /fo LIST /v

Folder: \Microsoft\Windows Defender
HostName:                             B33F
TaskName:                             \Microsoft\Windows Defender\MP Scheduled Scan
Next Run Time:                        1/22/2014 5:11:13 AM
Status:                               Ready
Logon Mode:                           Interactive/Background
Last Run Time:                        N/A
Last Result:                          1
Author:                               N/A
Task To Run:                          c:\program files\windows defender\MpCmdRun.exe Scan -ScheduleJob
                                      -WinTask -RestrictPrivilegesScan
Start In:                             N/A
Comment:                              Scheduled Scan
Scheduled Task State:                 Enabled
Idle Time:                            Only Start If Idle for 1 minutes, If Not Idle Retry For 240 minutes
Power Management:                     No Start On Batteries
Run As User:                          SYSTEM
Delete Task If Not Rescheduled:       Enabled
Stop Task If Runs X Hours and X Mins: 72:00:00
Schedule:                             Scheduling data is not available in this format.
Schedule Type:                        Daily
Start Time:                           5:11:13 AM
Start Date:                           1/1/2000
End Date:                             1/1/2100
Days:                                 Every 1 day(s)
Months:                               N/A
Repeat: Every:                        Disabled
Repeat: Until: Time:                  Disabled
Repeat: Until: Duration:              Disabled
Repeat: Stop If Still Running:        Disabled
[..Snip..]

# tasklist命令显示了正在运行的进程以及启动服务。

C:\Windows\system32> tasklist /SVC

Image Name                     PID Services
========================= ======== ============================================
System Idle Process              0 N/A
System                           4 N/A
smss.exe                       244 N/A
csrss.exe                      332 N/A
csrss.exe                      372 N/A
wininit.exe                    380 N/A
winlogon.exe                   428 N/A
services.exe                   476 N/A
lsass.exe                      484 SamSs
lsm.exe                        496 N/A
svchost.exe                    588 DcomLaunch, PlugPlay, Power
svchost.exe                    668 RpcEptMapper, RpcSs
svchost.exe                    760 Audiosrv, Dhcp, eventlog,
                                   HomeGroupProvider, lmhosts, wscsvc
svchost.exe                    800 AudioEndpointBuilder, CscService, Netman,
                                   SysMain, TrkWks, UxSms, WdiSystemHost,
                                   wudfsvc
svchost.exe                    836 AeLookupSvc, BITS, gpsvc, iphlpsvc,
                                   LanmanServer, MMCSS, ProfSvc, Schedule,
                                   seclogon, SENS, ShellHWDetection, Themes,
                                   Winmgmt, wuauserv
audiodg.exe                    916 N/A
svchost.exe                    992 EventSystem, fdPHost, netprofm, nsi,
                                   WdiServiceHost, WinHttpAutoProxySvc
svchost.exe                   1104 CryptSvc, Dnscache, LanmanWorkstation,
                                   NlaSvc
spoolsv.exe                   1244 Spooler
svchost.exe                   1272 BFE, DPS, MpsSvc
mDNSResponder.exe             1400 Bonjour Service
taskhost.exe                  1504 N/A
taskeng.exe                   1556 N/A
vmtoolsd.exe                  1580 VMTools
dwm.exe                       1660 N/A
explorer.exe                  1668 N/A
vmware-usbarbitrator.exe      1768 VMUSBArbService
TPAutoConnSvc.exe             1712 TPAutoConnSvc
[..Snip..]

C:\Windows\system32> net start

These Windows services are started:

   Application Experience
   Application Information
   Background Intelligent Transfer Service
   Base Filtering Engine
   Bluetooth Support Service
   Bonjour Service
   COM+ Event System
   COM+ System Application
   Cryptographic Services
   DCOM Server Process Launcher
   Desktop Window Manager Session Manager
   DHCP Client
   Diagnostic Policy Service
   Diagnostic Service Host
   Diagnostic System Host
   Distributed Link Tracking Client
   Distributed Transaction Coordinator
   DNS Client
   Function Discovery Provider Host
   Function Discovery Resource Publication
   Group Policy Client
[..Snip..]

# DRIVERQUERY有时是有用的,因为一些第三方驱动,即使是信誉良好的公司,也比瑞士奶酪上的洞多。这是可能的,因为ring0的利用是在大多数人的专长技能之外。

C:\Windows\system32> DRIVERQUERY

Module Name  Display Name           Driver Type   Link Date
============ ====================== ============= ======================
1394ohci     1394 OHCI Compliant Ho Kernel        11/20/2010 6:01:11 PM
ACPI         Microsoft ACPI Driver  Kernel        11/20/2010 4:37:52 PM
AcpiPmi      ACPI Power Meter Drive Kernel        11/20/2010 4:47:55 PM
adp94xx      adp94xx                Kernel        12/6/2008 7:59:55 AM
adpahci      adpahci                Kernel        5/2/2007 1:29:26 AM
adpu320      adpu320                Kernel        2/28/2007 8:03:08 AM
AFD          Ancillary Function Dri Kernel        11/20/2010 4:40:00 PM
agp440       Intel AGP Bus Filter   Kernel        7/14/2009 7:25:36 AM
aic78xx      aic78xx                Kernel        4/12/2006 8:20:11 AM
aliide       aliide                 Kernel        7/14/2009 7:11:17 AM
amdagp       AMD AGP Bus Filter Dri Kernel        7/14/2009 7:25:36 AM
amdide       amdide                 Kernel        7/14/2009 7:11:19 AM
AmdK8        AMD K8 Processor Drive Kernel        7/14/2009 7:11:03 AM
AmdPPM       AMD Processor Driver   Kernel        7/14/2009 7:11:03 AM
amdsata      amdsata                Kernel        3/19/2010 9:08:27 AM
amdsbs       amdsbs                 Kernel        3/21/2009 2:35:26 AM
amdxata      amdxata                Kernel        3/20/2010 12:19:01 AM
AppID        AppID Driver           Kernel        11/20/2010 5:29:48 PM
arc          arc                    Kernel        5/25/2007 5:31:06 AM
[..Snip..]
在t4阶段,神秘艺术之WMIC
我想提下WMIC (Windows Management Instrumentation Command-Line,Windows管理工具命令行),因为它是Windows最有用的命令行工具。WMIC对于信息收集和后渗透都是非常实用的。That being said it is a bit clunky and the output leaves much to be desired for.
全面的解释WMIC的使用将需要一个教程。补充一点,由于格式化的问题,WMIC有些输出将很难显示。
我将会在下面列出两个文章,这两个文章对于WMIC是非常值得阅读的。
- Command-Line Ninjitsu (SynJunkie)
- Windows WMIC Command Line (ComputerHope)
糟糕的是,一些默认配置的windows并不允许访问WMIC,除非是用户在windows的管理组,从我的虚拟机测试来看,任何版本的windows xp的低权限用户并不能访问WMIC。相反的,默认配置的windows 7 专业版和windows 8 企业版允许低权限的用户访问WMIC并查询操作系统版本。这正是我们所需要的,因为我们正在使用WMIC来收集关于目标机的信息。
关于WMIC的选项,我已经列出了下面可用的命令行。
C:\Windows\system32> wmic /?

[global switches]

The following global switches are available:
/NAMESPACE           Path for the namespace the alias operate against.
/ROLE                Path for the role containing the alias definitions.
/NODE                Servers the alias will operate against.
/IMPLEVEL            Client impersonation level.
/AUTHLEVEL           Client authentication level.
/LOCALE              Language id the client should use.
/PRIVILEGES          Enable or disable all privileges.
/TRACE               Outputs debugging information to stderr.
/RECORD              Logs all input commands and output.
/INTERACTIVE         Sets or resets the interactive mode.
/FAILFAST            Sets or resets the FailFast mode.
/USER                User to be used during the session.
/PASSWORD            Password to be used for session login.
/OUTPUT              Specifies the mode for output redirection.
/APPEND              Specifies the mode for output redirection.
/AGGREGATE           Sets or resets aggregate mode.
/AUTHORITY           Specifies the  for the connection.
/?[:<BRIEF|FULL>]    Usage information.

For more information on a specific global switch, type: switch-name /?


The following alias/es are available in the current role:
ALIAS                    - Access to the aliases available on the local system
BASEBOARD                - Base board (also known as a motherboard or system board) management.
BIOS                     - Basic input/output services (BIOS) management.
BOOTCONFIG               - Boot configuration management.
CDROM                    - CD-ROM management.
COMPUTERSYSTEM           - Computer system management.
CPU                      - CPU management.
CSPRODUCT                - Computer system product information from SMBIOS.
DATAFILE                 - DataFile Management.
DCOMAPP                  - DCOM Application management.
DESKTOP                  - User's Desktop management.
DESKTOPMONITOR           - Desktop Monitor management.
DEVICEMEMORYADDRESS      - Device memory addresses management.
DISKDRIVE                - Physical disk drive management.
DISKQUOTA                - Disk space usage for NTFS volumes.
DMACHANNEL               - Direct memory access (DMA) channel management.
ENVIRONMENT              - System environment settings management.
FSDIR                    - Filesystem directory entry management.
GROUP                    - Group account management.
IDECONTROLLER            - IDE Controller management.
IRQ                      - Interrupt request line (IRQ) management.
JOB                      - Provides  access to the jobs scheduled using the schedule service.
LOADORDER                - Management of system services that define execution dependencies.
LOGICALDISK              - Local storage device management.
LOGON                    - LOGON Sessions.
MEMCACHE                 - Cache memory management.
MEMORYCHIP               - Memory chip information.
MEMPHYSICAL              - Computer system's physical memory management.
NETCLIENT                - Network Client management.
NETLOGIN                 - Network login information (of a particular user) management.
NETPROTOCOL              - Protocols (and their network characteristics) management.
NETUSE                   - Active network connection management.
NIC                      - Network Interface Controller (NIC) management.
NICCONFIG                - Network adapter management.
NTDOMAIN                 - NT Domain management.
NTEVENT                  - Entries in the NT Event Log.
NTEVENTLOG               - NT eventlog file management.
ONBOARDDEVICE            - Management of common adapter devices built into the motherboard (system board).
OS                       - Installed Operating System/s management.
PAGEFILE                 - Virtual memory file swapping management.
PAGEFILESET              - Page file settings management.
PARTITION                - Management of partitioned areas of a physical disk.
PORT                     - I/O port management.
PORTCONNECTOR            - Physical connection ports management.
PRINTER                  - Printer device management.
PRINTERCONFIG            - Printer device configuration management.
PRINTJOB                 - Print job management.
PROCESS                  - Process management.
PRODUCT                  - Installation package task management.
QFE                      - Quick Fix Engineering.
QUOTASETTING             - Setting information for disk quotas on a volume.
RDACCOUNT                - Remote Desktop connection permission management.
RDNIC                    - Remote Desktop connection management on a specific network adapter.
RDPERMISSIONS            - Permissions to a specific Remote Desktop connection.
RDTOGGLE                 - Turning Remote Desktop listener on or off remotely.
RECOVEROS                - Information that will be gathered from memory when the operating system fails.
REGISTRY                 - Computer system registry management.
SCSICONTROLLER           - SCSI Controller management.
SERVER                   - Server information management.
SERVICE                  - Service application management.
SHADOWCOPY               - Shadow copy management.
SHADOWSTORAGE            - Shadow copy storage area management.
SHARE                    - Shared resource management.
SOFTWAREELEMENT          - Management of the  elements of a software product installed on a system.
SOFTWAREFEATURE          - Management of software product subsets of SoftwareElement.
SOUNDDEV                 - Sound Device management.
STARTUP                  - Management of commands that run automatically when users log onto the computer
                           system.
SYSACCOUNT               - System account management.
SYSDRIVER                - Management of the system driver for a base service.
SYSTEMENCLOSURE          - Physical system enclosure management.
SYSTEMSLOT               - Management of physical connection points including ports,  slots and
                           peripherals, and proprietary connections points.
TAPEDRIVE                - Tape drive management.
TEMPERATURE              - Data management of a temperature sensor (electronic thermometer).
TIMEZONE                 - Time zone data management.
UPS                      - Uninterruptible power supply (UPS) management.
USERACCOUNT              - User account management.
VOLTAGE                  - Voltage sensor (electronic voltmeter) data management.
VOLUME                   - Local storage volume management.
VOLUMEQUOTASETTING       - Associates the disk quota setting with a specific disk volume.
VOLUMEUSERQUOTA          - Per user storage volume quota management.
WMISET                   - WMI service operational parameters management.

For more information on a specific alias, type: alias /?

CLASS     - Escapes to full WMI schema.
PATH      - Escapes to full WMI object paths.
CONTEXT   - Displays the state of all the global switches.
QUIT/EXIT - Exits the program.

For more information on CLASS/PATH/CONTEXT, type: (CLASS | PATH | CONTEXT) /?
为了简化一些事情,我已经创建了一个脚本,可以在目标机器上使用WMIC提取以下信息:流程、服务、用户帐号、用户组、网络接口、硬盘信息、网络共享信息、安装Windows补丁、程序在启动运行、安装的软件列表、操作系统、时区信息。
我已经通过各种标志和参数来提取有价值的信息,如果有人想要添加到列表中,请在下面留下评论。使用内置的输出特性,脚本将把所有结果写入一个人类可读的html文件。
- 脚本地址 http://www.fuzzysecurity.com/tutorials/files/wmic_info.rar
- 输出页面 http://www.fuzzysecurity.com/tutorials/files/Win7.html
在t5-t6阶段,快速攻陷
在继续渗透之前,你需要先回顾一下已经搜集到的信息,信息量应该已经不小了。我们计划的下一步就是要寻找一些能被轻易利用的系统缺陷来提升权限。
显而易见,第一步就是去查看补丁修正情况。如果发现主机已经被打了某些补丁,也不用很担心。我的 WMIC 脚本可以列出所有已安装的补丁,你可以通过下面这条命令来查看:
|
|
但这些输出并不代表一定可以被利用,最好的策略先是去寻找可以提升权限的 EXP 以及它们的补丁编号。这些 EXP 包括但不限于:KiTrap0D (KB979682), MS11-011 (KB2393802), MS10-059 (KB982799), MS10-021 (KB979683), MS11-080 (KB2592799)。在列举了系统版本和补丁包后,你应该发现哪些权限提升漏洞可以被复现,使用补丁包编号你可以过滤掉那些已经被安装的补丁,检查一下是否有被漏打的补丁。
以下是对补丁包进行过滤的语法
|
|
接下来我们将会有很多新发现。一般情况下,如果需要给很多机器配置同一个环境,一个技术人员一定不会逐个安装配置这些机器,而是会选择一些自动化安装的解决方案。这些方案是什么以及它们是如何工作的与我们当下所做的事不是很相关,重要的是他们留下的用于安装流程的配置文件,这些配置文件包含大量的敏感信息,例如操作系统的产品密钥和管理员密码。而我们最最感兴趣的就是管理员密码,因为我们可以借此来提升我们的权限。
以下是一些经常被用于存放配置文件的位置(当然检查整个系统也是可以的)
|
|
这些目录中的文件可能包含着明文密码,或是Base64加密后的密码。下面是一些文件中的样例:
|
|
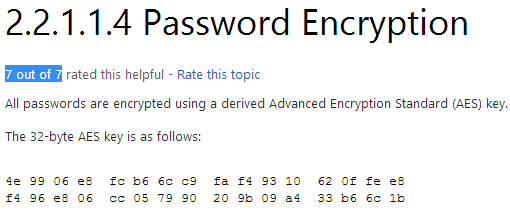
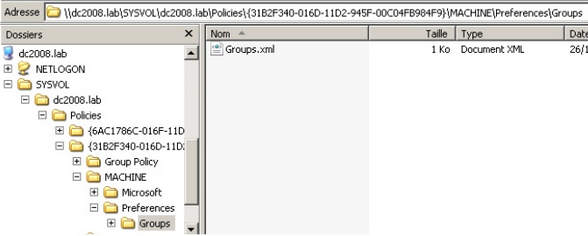
在 Ben Campbell (@Meatballs__) 的推荐下,我将获取组策略首选项 ( Group Policy Preferences ) 保存的密码也作为快速攻陷目标机器的方式之一。组策略首选项文件可以被用于去创建域内主机的本地用户。如果你控制的机器被连接到一个域内,那么去查找一下存储在 SYSVOL 中的 Groups.xml 文件也是很有意义的,而且所有被授权的用户都有该文件的读权限。在这个 xml 文件中的密码只是被临时用户“模糊”地用 AES 加密了,说“模糊”是因为静态密钥已经被公开的公布于 msdn 网站上,所以可以轻松地破解这些密码。
除了 Groups.xml 还有几个其他的策略首选项文件也同样含有可选的 “cPassword” 属性:
Services\Services.xml: Element-Specific Attributes
ScheduledTasks\ScheduledTasks.xml: Task Inner Element, TaskV2 Inner Element, ImmediateTaskV2 Inner Element
Printers\Printers.xml: SharedPrinter Element
Drives\Drives.xml: Element-Specific Attributes
DataSources\DataSources.xml: Element-Specific Attributes
这个漏洞可以通过手动浏览 SYSVOL 文件夹和抓取相关文件来利用,证明如下
然而,我们都希望有一个自动化的解决方案,这样我们就可以尽可能快的完成这项工作。这里主要有两种方式,取决于我们的 shell 类型以及权限大小,(1) 一个是通过已建立的会话执行 metasploit 模块 或 (2) 你可以使用 PowerSploit 的 Get-GPPPassword 功能。PowerSploit 是一个强大的 powershell 框架,作者是 Matt Graeber(擅长逆向工程、计算机取证以及渗透测试)。
接下来我们要查找一个奇怪的注册表设置项 “AlwaysInstallElevated”,如果该设置项被启用,它会允许任何权限的用户以 NT AUTHORITY\SYSTEM 权限来安装 *.msi 文件。可以创建低权限的用户(它们的操作系统使用受到限制)但是却给它们 SYSTEM 权限去安装软件,这在我看来是有些奇怪。想要阅读更多的这方面的背景知识,可以查看这里 ,这是在 GreyHatHacker 博客上 Parvez 的一篇文章,他最早报告了这个安全问题。
为了能利用这个漏洞,我们需要去检查两个注册表键值是否被设置,这是我们是否能弹出 SYSTEM 权限 shell 的关键。以下是查询对应注册表键值的语法
|
|
为了完成这个章节,我们还将在操作系统上做一些快速搜索,希望我们可以成功。
执行以下语句完成搜索
|
|
在t7-t10阶段,撸起袖子加油干
希望到了现在我们已经有了一个 SYSTEM shell,但如果我们还没有,接下来还有一些攻击方法可以尝试。在最后章节我们将会关注于 Windows 服务和文件/目录权限部分。我们的目标是去使用低权限去提升当前会话权限。
我们将会检查很多权限情况,所以我们应该抓取一份微软 Sysinternals 套件中 accesschk.exe 工具的副本。微软 Sysinternals 套件包含了许多强大的工具,但微软并没有把它们加入标准版的 Windows。你可以从 微软 technet 网站下载该套件
我们将会先从 Windows 开启的服务来寻找线索,因为那里可以发现很多快速制胜的方法。通常来说,现代操作系统不会包含存在漏洞的服务。在这种情况下,漏洞指的是我们可以重新配置的服务参数。Windows 服务有点像应用程序的快捷键,下面是一个例子
|
|
我们可以使用 accesschk 检查每一个服务的权限
|
|
Accesschk 可以自动化的检测我们是否拥有一个 Windows 服务的写权限。作为一个低权限用户,我们通常希望检查结果为 “Authenticated Users”。一定要去检查你的用户属于哪个用户组,举个例子,“Power Users” 被认为是一个低权限用户组(尽管它没有被广泛使用)
一起来比较一下在 Windows 8 和 Windows XP SP0 上输出的不同
|
|
这个问题在之后的 XP SP2 版本中得到了解决,然而在 SP0 和 SP1 它可以被用作一个通用的本地提权漏洞。通过重新配置该服务,我们可以让它以 SYSTEM 权限运行任何我们指定的二进制文件。
让我们来看看怎么实践操作,在这个例子里该服务将会执行 netcat 并且可以反弹一个 SYSTEM 权限的 shell。其它的操作方法当然也是可能存在的。
|
|

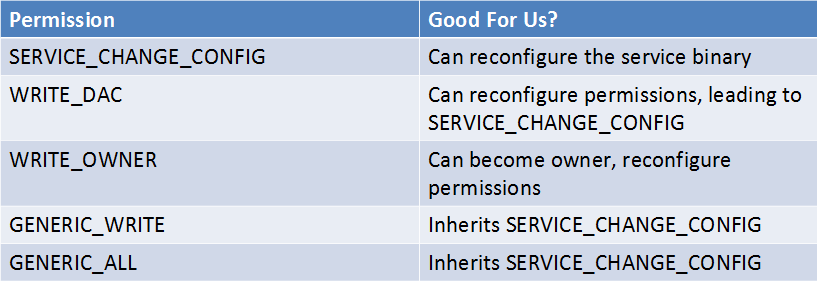
即使服务是不正确配置的,我们大多时候也不能获取该服务完整的控制权限。下图是从 Brett Moore’s 在 Windows 提权方面的渗透测试,图中的任一权限都可以给我们一个 SYSTEM shell
重要的是去记住我们搞定的 session 是属于哪个用户组的,正如先前提到的 “Power Users” 被视为是一个低权限用户组。但 “Power Users” 也有一些属于他们自己的配置漏洞, Mark Russinovich 已经在这个问题上写了非常有趣的文章。
“Power Users” 的力量 ( Mark Russinovich )
最后,我们将会检查文件/目录的权限,如果我们不能直接攻击计算机系统,我们就让计算机做所有的繁重工作。由于这方面涉及内容太多,所以我将介绍两种提权漏洞给你,并展示如何去利用它们。一旦你掌握了通用的思路,你将能够在其它场景下应用这些技术。
作为第一个示例,我们将复现 GreyHatHacker 上 Parvez 的一篇文章中的方法。“利用低文件夹权限提权”,这是一个很棒的提权思路,我非常推荐大家去阅读。
这个示例是DLL 劫持中的一个特例。程序通常不能通过它们自身实现功能,它们需要挂载许多自身所需的资源(大多是 DLL 但也有某些特有文件)。如果一个程序或服务从一个我们拥有写权限的目录中装载了文件,那我们就可以借此弹出一个与之相同权限的 shell
通常一个 Windows 应用程序将会使用一个预定义的搜索路径去寻找 DLL 组件,而且它会以特定的顺序检查这些路径。DLL 劫持经常是将一个恶意的 DLL 置于某一搜索路径中,并确保恶意 DLL 会在合法的 DLL 之前被找到。
以下是在32位操作系统下 DLL 查找的顺序
|
|
有时应用程序想要加载的 DLL 可能不在主机上,引起该问题的原因有很多,比如当 DLL 文件只存在于某个未安装的插件或者计算机特性(feature)时。在这种情况下, Parvez 发现某些 Windows 服务会去试图加载默认安装中不存在的 DLL。
但由于问题中的 DLL 不存在,所以我们将遍历所有路径。作为一个低权限的用户,也许我们可以去放置一个恶意 DLL 在上述路径中的 1-4 中。而路径 5 是行不通的,因为我们正在研究的是 Windows 服务,我们并没有所有目录的写权限
让我们来看一下如何进行实战,在本例中,我们将会利用需要加载 wlbsctrl.dll 的 IKEEXT (IKE and AuthIP IPsec Keying Modules) 服务
|
|
现在必要的条件都已经满足了,我们可以生成一个恶意的 DLL 并弹出一个 shell
|
|
在将恶意 DLL 传送到靶机之后,我们需要将它重命名为 wlbsctrl.dll 并将它移动到 “C:\Python27” 路径下。完成后,我们只需要耐心等待机器被重启(或者我们可以尝试强制重启),之后我们就可以得到一个 SYSTEM shell。
|
|
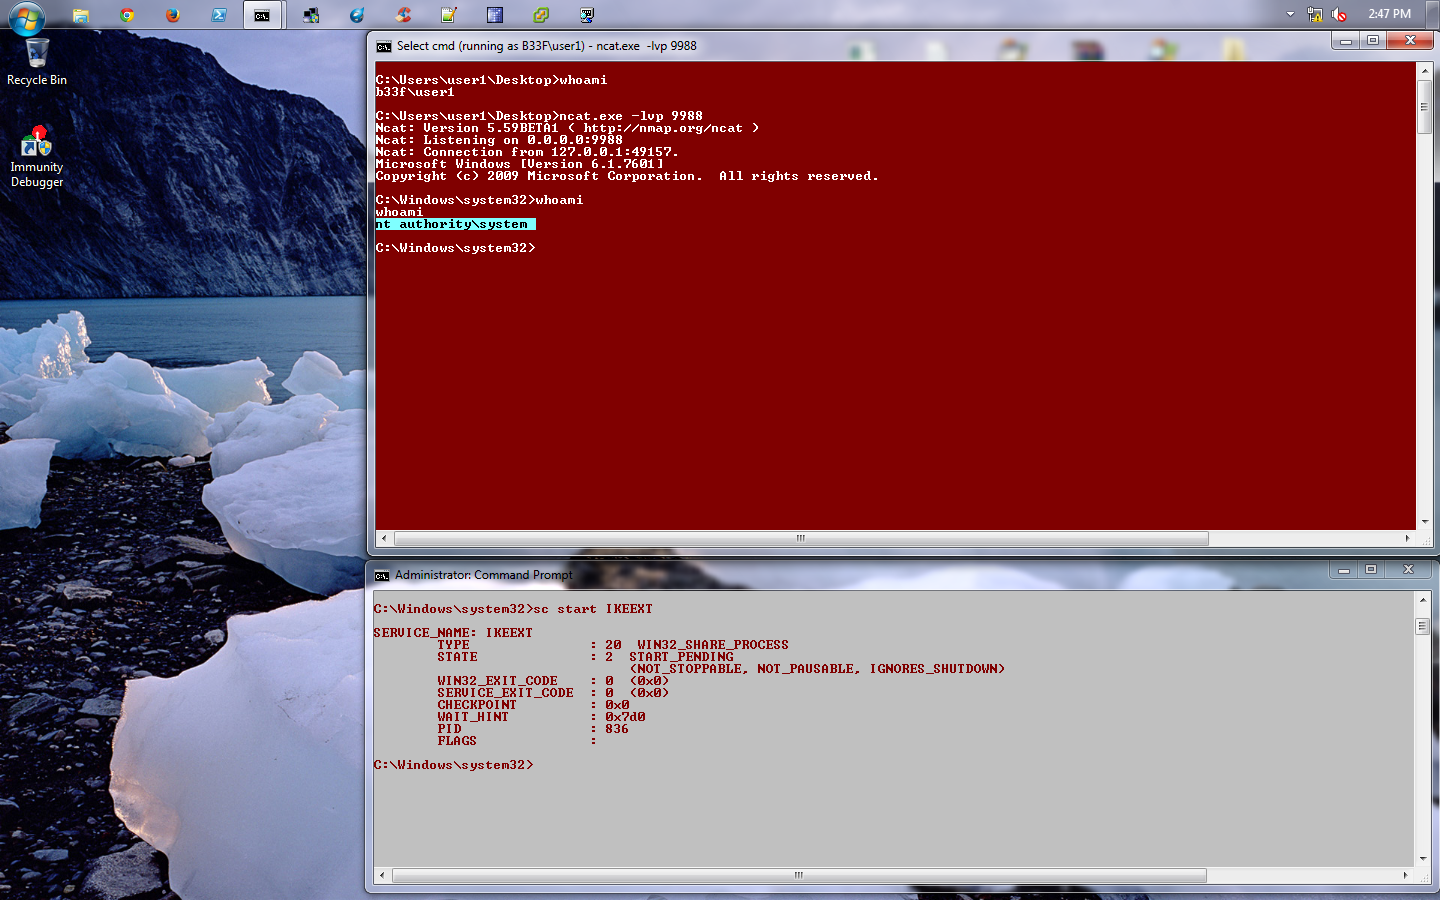
万事俱备,我们只需要等待机器重启。出于演示目的,我在下面截图中是使用管理员指令手动重启该服务
对于我们最后的例子,我们将关注于计划任务。回顾我们之前搜集到的信息,我们有以下条目
|
|
这看起来像有一个 TFTP 客户端连接到远程主机去搜集某些 log 文件。我们可以看到这个任务每日早9点以 SYSTEM 权限运行,再看看我们是否有这个文件夹的写权限
|
|
显然这是一个严重的配置问题,这个计划任务根本不需要以 SYSTEM 权限执行,但更糟糕的是任何授权的用户都有该目录的写权限。理想情况下,对于一次渗透测试我会抓取一个 TFTP 客户端在里面放一个后门,确保它仍然正常工作,再将其放回靶机。然而出于演示目的,我们可以简单的通过 metasploit 生成一个二进制文件然后直接覆盖它。
|
|
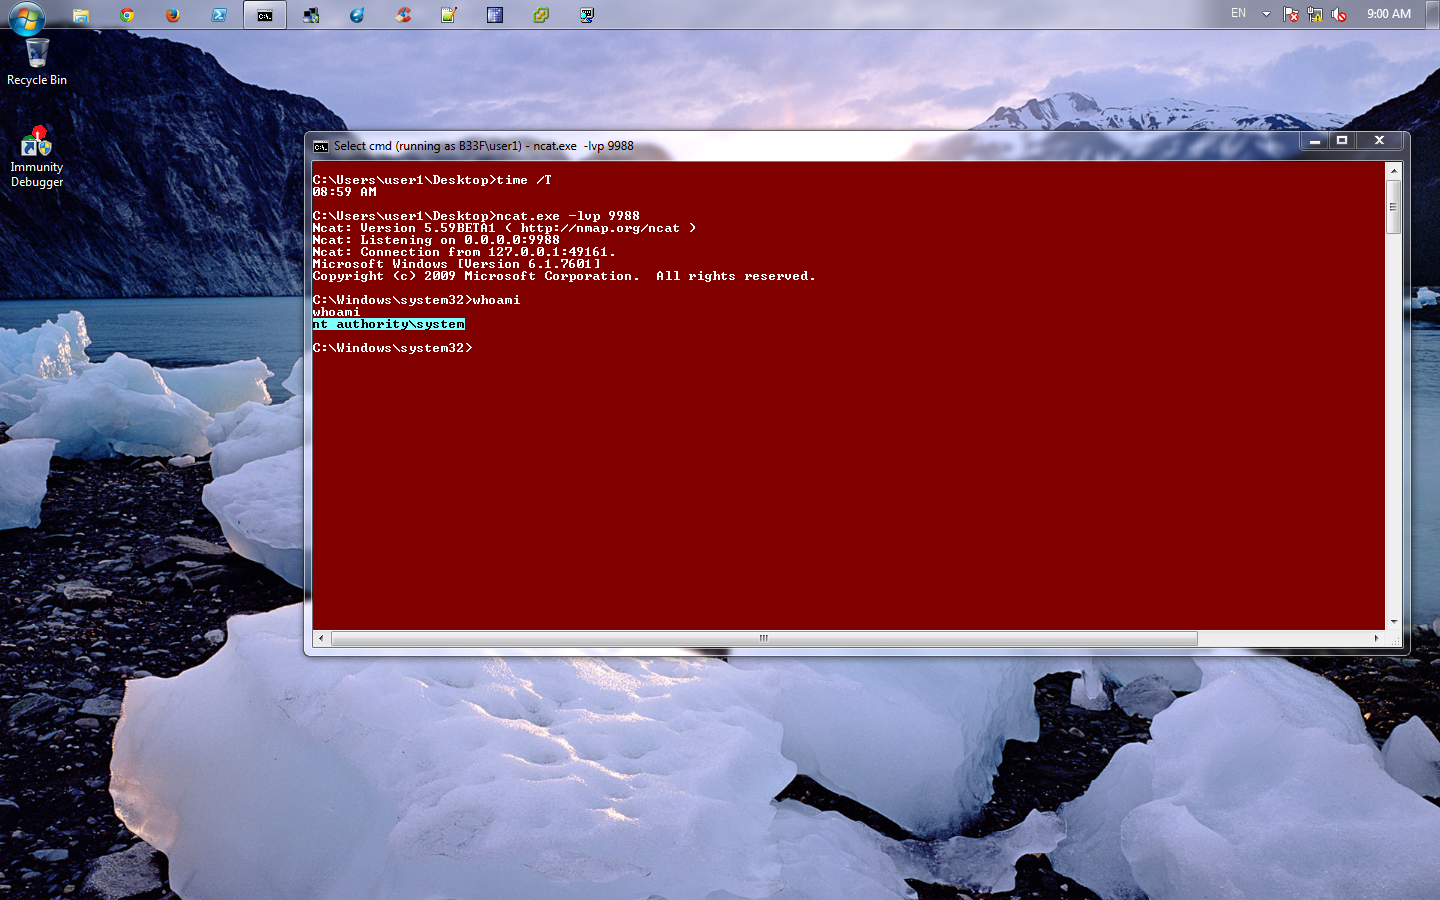
现在工作只剩下上传我们的恶意可执行文件并覆盖掉 “E:\GrabLogs\tftp.exe” 文件。一旦上传成功,我们就可以去休息了,等到明早睡醒就可以得到我们的 shell 。对了,别忘记去检查我们靶机的时间/时区
|
|
为了证明这次提权,我调快了系统时间。从以下截图中可以看到,在早9点时我们得到了 SYSTEM shell
在思考获取文件/文件夹权限时,这两个示例应该会给你一些寻找漏洞的思路。真正的实战中你可能需要花时间去检查所有的Windows服务、计划任务和开机任务的 binpaths
我们已经知道了 accesschk 是一种测试工具。在文章结束之前,我会再给你一些使用 accesschk 的技巧
|
|
最后的一些想法
本指南旨在成为Windows特权升级的“基础”。如果你想真正掌握这个主题,你需要投入大量的工作和研究。就像所有的渗透测试一样,举一反三是关键,你对目标的了解越多,攻击的途径越多,成功的几率就越大。
还要记住,有时你可能会将你的权限提升到管理员。从管理员到系统的提权是一个无关紧要的问题,你可以始终重新配置一个服务,或者创建一个具有系统级别特权的调度任务。
现在就去实践,然后得到SYSTEM!!